简介
A-Frame是一个用于构建虚拟现实(VR)体验的Web框架。 A-Frame基于HTML之上,使其更加易于上手。但是A-Frame不仅仅是3D场景图或标记语言;他的核心是一个强大的实体组件框架,它对three.js进行扩展,提供了一个声明性的、可扩展的和可组合的结构。A-Frame 最初是在Mozilla内部构思的,现在由 Supermedium 进行维护.官网 https://aframe.io/
搭建基础场景
HTML结构
<html>
  <head>
    <script src="https://aframe.io/releases/1.2.0/aframe.min.js"></script>
  </head>
  <body>
    <a-scene>
    </a-scene>
  </body>
</html>
<a-scene>将会处理我们场景中用到的所有3D元素.
添加元件
在<a-scene>中,我们可以使用普通的HTML标签的方式添加,A-Frame的标准元件,通过设置属性来进行元件的设置,比如 <a-box>长方体,<a-cylinder>圆柱体,<a-plane>平面,<a-sphere>球体.<a-box>的属性见此,https://aframe.io/docs/1.2.0/primitives/
添加一个红色立方体
<a-scene>
	<a-box color="red"></a-box>
</a-scene>
这些标签可以很容易的添加基础元件.非常方便,但是<a-box>实际上是一个包含geometry(几何)和meterial(材质)组件<a-entity>的元件.上面的代码对应为:
<a-scene>
	<a-entity id="box" geometry="primitive: box" material="color: red"></a-entity>
</a-scene>
因为默认的camera组件是摆放到了 0 ,0,0 位置,所以我们并不能看到这个元件.
3D坐标系
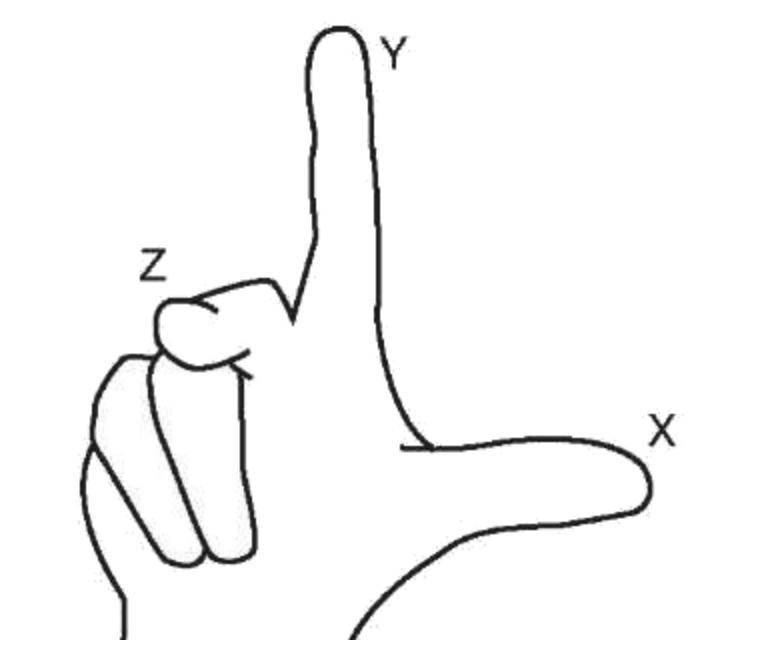
A-Frame使用右手坐标系,x轴的正方形指向我们的右手边,y轴正方向指向上方,Z轴的正方向为从屏幕向外指向我们的方向.坐标的单位为米.因为WebVR API 是使用的米作为单位.在我们的电脑和VR设置中尺寸的感觉会有点不一样如果是做VR 开发要特别感受下.WEB上的10米在VR里会显得特别大.

坐标的旋转使用角度作为单位.内部 three.js进行转换时会替换为弧度.旋转的正方向均为右手坐标系中手指卷曲的方向.
x轴旋转,正方向为z轴正方方向,即从屏幕向我们眼睛延伸的方向
y轴旋转,正方向为z轴的负方向,即从屏幕往我们眼睛相反的方向,往屏幕内旋转
z轴旋转,正方向为逆时针方向,即往上方旋转
使用 position改变元件的位置,rotation改变旋转角度,scale对元件进行缩放
<a-scene>
  <a-box color="red" rotation="0 45 45" scale="2 2 2"></a-box>
</a-scene>
以上会将一个红色的立方体绕y轴和x轴分别旋转45度,并在3个轴进行2倍缩放
父子元件
场景中每个元件可以有一个父元件和多个子级元件.子元件集成父元件的位置信息.
<a-scene>
  <a-box position="0 2 0" rotation="0 45 45" scale="2 4 2">
    <a-sphere position="1 0 3"></a-sphere>
  </a-box>
</a-scene>
如上面子圆球元件的世界坐标会是 1,2,3.子元件是在父元件的基础上进行变化.如果父元件的坐标发生变化会,子元件也会跟随进行变化.
移动位置
因为默认的位置是在 0 0 0 坐标,为了让我们的摄像机能看到元件我们需要在Y轴的负方向移动一下我们的元件.例如
<a-scene>
  <a-box color="red" position="0 2 -5" rotation="0 45 45" scale="2 2 2"></a-box>
</a-scene>
在浏览器或者桌面应用中我们可以使用鼠标点击拖拽来查看内容.也可以通过WASD按键和方向键来控制摄像机的移动,在移动端通过按压旋转来调整摄像机.
环境组件
A-Frame允许开发者创建和分享可以重复使用的组件,@feiss分享了一个环境组件,可以一行代码生成各种风格的环境场景.我们可以很方便的进行测试.
引入组件
<head>
  <script src="https://aframe.io/releases/1.2.0/aframe.min.js"></script>
  <script src="https://unpkg.com/aframe-environment-component/dist/aframe-environment-component.min.js"></script>
</head>
在场景中使用
<a-scene>
  <a-box color="red" position="0 2 -5" rotation="0 45 45" scale="2 2 2"></a-box>

  <!-- Out of the box environment! -->
  <a-entity environment="preset: forest; dressingAmount: 500"></a-entity>
</a-scene>
详细使用参考 https://github.com/feiss/aframe-environment-component/
使用材质
我们可以对元件添加材质,只需要像图片一样指定src熟悉即可,如果设置了color属性.则颜色会和材质进行融合.
<a-scene>
  <a-box src="https://i.imgur.com/mYmmbrp.jpg" position="0 2 -5" rotation="0 45 45"
    scale="2 2 2"></a-box>
  <a-sky color="#222"></a-sky>
</a-scene>
使用资产管理器
使用资产管理器可以提高性能,让浏览器对资源进行缓存,确保渲染之前资产都已经加载.我们可以更好进行复用.包含跨域之类的配置也由系统统一处理.
<a-scene>
  <a-assets>
    <img id="boxTexture" src="https://i.imgur.com/mYmmbrp.jpg">
  </a-assets>

  <a-box src="#boxTexture" position="0 2 -5" rotation="0 45 45" scale="2 2 2"></a-box>

  <a-sky color="#222"></a-sky>
</a-scene>
直接本地文件方式会有跨域无法访问,需要启动一个HTTP 服务器
添加天空
使用 <a-sky>可以添加一个背景到场景中.天空是将一个球体包裹场景将图片或你设置的颜色贴图到球体上.可以设置为颜色,360度图片或者视频.
<a-scene>
  <a-box color="red" position="0 2 -5" rotation="0 45 45" scale="2 2 2"></a-box>

  <a-sky color="#222"></a-sky>
</a-scene>
使用全景图片
<a-scene>
  <a-assets>
    <img id="boxTexture" src="https://i.imgur.com/mYmmbrp.jpg">
    <img id="skyTexture"
      src="https://cdn.aframe.io/360-image-gallery-boilerplate/img/sechelt.jpg">
  </a-assets>

  <a-box src="#boxTexture" position="0 2 -5" rotation="0 45 45" scale="2 2 2"></a-box>

  <a-sky src="#skyTexture"></a-sky>
</a-scene>
添加地面
使用<a-plane>可以添加一个屏幕,默认的平面是在xy平面上.如果平面作为地面则需要将其沿着x轴旋转-90度.
<a-plane rotation="-90 0 0"></a-plane>
我们可以设置他们的width和height让平面足够大.然后我们为平面贴上贴图.为了让贴图铺满整个平面可以使用repeat="10 10"来平铺贴图.
调整灯光
我们可以通过<a-light>为场景添加多个灯光.默认我们没有添加灯光,A-Frame会为我们添加一个环境灯和平行光灯.如果我们添加了灯光.默认的灯光就会取消.
环境光会作用到场景中的所有元素,给他们一个默认的材质表现
点光源对实体的影响取决于他们之间的距离.
<a-scene>
  <a-assets>
    <img id="boxTexture" src="https://i.imgur.com/mYmmbrp.jpg">
    <img id="skyTexture"
      src="https://cdn.aframe.io/360-image-gallery-boilerplate/img/sechelt.jpg">
    <img id="groundTexture" src="https://cdn.aframe.io/a-painter/images/floor.jpg">
  </a-assets>

  <a-box src="#boxTexture" position="0 2 -5" rotation="0 45 45" scale="2 2 2"></a-box>

  <a-sky src="#skyTexture"></a-sky>

  <a-light type="ambient" color="#445451"></a-light>
  <a-light type="point" intensity="2" position="2 4 4"></a-light>
</a-scene>
添加动画
使用A-Frame内部的动画系统可以给对象添加动画效果
<a-scene>
  <a-assets>
    <img id="boxTexture" src="https://i.imgur.com/mYmmbrp.jpg">
  </a-assets>

  <a-box src="#boxTexture" position="0 2 -5" rotation="0 45 45" scale="2 2 2"
         animation="property: object3D.position.y; to: 2.2; dir: alternate; dur: 2000; loop: true"></a-box>
</a-scene>
对属性 https://aframe.io/docs/1.2.0/core/entity.html#object3d 进行变换.
添加交互
通过添加交互我们可以让诸如鼠标点击来影响场景的变化.首先我们要添加一个鼠标
<a-scene>
  <a-assets>
    <img id="boxTexture" src="https://i.imgur.com/mYmmbrp.jpg">
  </a-assets>

  <a-box src="#boxTexture" position="0 2 -5" rotation="0 45 45" scale="2 2 2"
         animation="property: object3D.position.y; to: 2.2; dir: alternate; dur: 2000; loop: true"></a-box>

  <a-camera>
    <a-cursor></a-cursor>
  </a-camera>
</a-scene>
我们再摄像机中将鼠标添加为他的子元素.鼠标就会跟随摄像机运动了.
添加事件监听,最简单的方式,在<script>标签添加
  var boxEl = document.querySelector('a-box');
  boxEl.addEventListener('mouseenter', function () {
    boxEl.setAttribute('scale', {x: 2, y: 2, z: 2});
  });
更好的方式是把这个事件处理机制包装成A-Frame的组件.如下:
  AFRAME.registerComponent('scale-on-mouseenter', {
    schema: {
      to: {default: '2.5 2.5 2.5', type: 'vec3'}
    },

    init: function () {
      var data = this.data;
      var el = this.el;
      this.el.addEventListener('mouseenter', function () {
        el.object3D.scale.copy(data.to);
      });
    }
  });
this.el.object3D.scale 直接调用性能更好
使用
<script>
  AFRAME.registerComponent('scale-on-mouseenter', {
    // ...
  });
</script>

<a-scene>
  <!-- ... -->
  <a-box src="#boxTexture" position="0 2 -5" rotation="0 45 45" scale="2 2 2"
         animation="property: object3D.position.y; to: 2.2; dir: alternate; dur: 2000; loop: true"
         scale-on-mouseenter></a-box>
  <!-- ... -->
</a-scene>
事件触发动画
动画组件可以在元件发生事件时进行动画.我们可以简单的通过startEvents属性来实现,多个事件名字用逗号分隔
对元件配置多个动画使用 __<ID>的方式.
<a-box
  src="#boxTexture"
  position="0 2 -5"
  rotation="0 45 45"
  scale="2 2 2"
  animation__position="property: object3D.position.y; to: 2.2; dir: alternate; dur: 2000; loop: true"
  animation__mouseenter="property: scale; to: 2.3 2.3 2.3; dur: 300; startEvents: mouseenter"
  animation__mouseleave="property: scale; to: 2 2 2; dur: 300; startEvents: mouseleave"></a-box>
添加音频
通过资产管理器添加音频
<a-scene>
  <a-assets>
    <audio src="https://cdn.aframe.io/basic-guide/audio/backgroundnoise.wav" autoplay
      preload></audio>
  </a-assets>

  <!-- ... -->
</a-scene>
我们可以在空间中添加音频,这样音频就会根据摄像机的位置来计算声音的大小
<a-scene>
  <!-- ... -->
  <a-sound src="https://cdn.aframe.io/basic-guide/audio/backgroundnoise.wav" autoplay="true"
    position="-3 1 -4"></a-sound>
  <!-- ... -->
</a-scene>
添加文本
<a-entity
  text="value: Hello, A-Frame!; color: #BBB"
  position="-0.9 0.2 -3"
  scale="1.5 1.5 1.5"></a-entity>
文本渲染还有这个组件 可以参考 Jam3/three-bmfont-text: renders BMFont files in ThreeJS with word-wrapping (github.com)
搭建360度全景图展示
先看看效果 Glitch AFrame Gallery
搭建框架
<a-scene>
  <a-assets>
    <audio id="click-sound" src="https://cdn.aframe.io/360-image-gallery-boilerplate/audio/click.ogg"></audio>
    <!-- Images. -->
    <img id="city" src="https://cdn.aframe.io/360-image-gallery-boilerplate/img/city.jpg">
    <img id="city-thumb" src="https://cdn.aframe.io/360-image-gallery-boilerplate/img/thumb-city.jpg">
    <img id="cubes" src="https://cdn.aframe.io/360-image-gallery-boilerplate/img/cubes.jpg">
    <img id="cubes-thumb" src="https://cdn.aframe.io/360-image-gallery-boilerplate/img/thumb-cubes.jpg">
    <img id="sechelt" src="https://cdn.aframe.io/360-image-gallery-boilerplate/img/sechelt.jpg">
    <img id="sechelt-thumb" src="https://cdn.aframe.io/360-image-gallery-boilerplate/img/thumb-sechelt.jpg">
  </a-assets>

  <!-- 360-degree image. -->
  <a-sky id="image-360" radius="10" src="#city"></a-sky>

  <!-- Link template we will build. -->
  <a-entity class="link"></a-entity>

  <!-- Camera + Cursor. -->
  <a-camera>
    <a-cursor
      id="cursor"
      animation__click="property: scale; from: 0.1 0.1 0.1; to: 1 1 1; easing: easeInCubic; dur: 150; startEvents: click"
      animation__clickreset="property: scale; to: 0.1 0.1 0.1; dur: 1; startEvents: animationcomplete__click"
      animation__fusing="property: scale; from: 1 1 1; to: 0.1 0.1 0.1; easing: easeInCubic; dur: 150; startEvents: fusing"></a-cursor>
  </a-camera>
</a-scene>
框架中我们做了以下的工作
- 在资源管理器中设置了我们要加载的图片和音频资源
- 使用
<a-sky>元素来存放我们的360度图片 - 在摄像机中添加了一个鼠标,增加了一些基于事件的动画
使用标准组件
A-Frame提供内建了很多标准组件.我们使用一些贴上材质的平面来作为链接.点击这个平面后修改全景图的内容.从一个空白实体开始
<a-entity class="link"></a-entity>
我们对这个元素设置 geometry属性,与行内CSS类似
<a-entity
  class="link"
  geometry="primitive: plane; height: 1; width: 1"></a-entity>
同时设置他的材质,使用material属性
<a-entity class="link"
  geometry="primitive: plane; height: 1; width: 1"
  material="shader: flat; src: #cubes-thumb"></a-entity>
shader:flat 表示该对象不受灯光系统的影响
再加上声音 sound属性
<a-entity class="link"
  geometry="primitive: plane; height: 1; width: 1"
  material="shader: flat; src: #cubes-thumb"
  sound="on: click; src: #click-sound"></a-entity>
点击这个对象就会播放我们指定的声音
使用开源组件
AFrame的组件较少但是有很多开源的组件,可以通过NPM 下载很多组件在我们的HTML代码中直接使用.下面会用到以下几个组件.这里 Superframe (supermedium.com) 有 supermedium收集的很多组件.
- event-set https://supermedium.com/superframe/components/event-set/ 设置响应的属性
- layout https://supermedium.com/superframe/components/layout/ 对元件进行布局
- proxy-event https://supermedium.com/superframe/components/proxy-event/ 代理事件
- template https://supermedium.com/superframe/components/template/ 模板引擎批量生产元件
加载组件
<html>
  <head>
    <title>360° Image Browser</title>
    <script src="https://aframe.io/releases/1.2.0/aframe.min.js"></script>
    <script src="https://unpkg.com/aframe-template-component@3.x.x/dist/aframe-template-component.min.js"></script>
    <script src="https://unpkg.com/aframe-layout-component@4.x.x/dist/aframe-layout-component.min.js"></script>
    <script src="https://unpkg.com/aframe-event-set-component@5.x.x/dist/aframe-event-set-component.min.js"></script>
    <script src="https://unpkg.com/aframe-proxy-event-component/dist/aframe-proxy-event-component.min.js"></script>
  </head>
  <body>
    <a-scene>
      <!-- ... -->
    </a-scene>
  </body>
</html>
使用template组件
template组件文档 地址 aframe-super-hot-loader/example at master · supermedium/aframe-super-hot-loader (github.com)
首先在资源管理器中定义模板
<a-assets>
  <!-- ... -->
  <script id="plane" type="text/html">
    <a-entity class="link"
      geometry="primitive: plane; height: 1; width: 1"
      material="shader: flat; src: ${thumb}"
      sound="on: click; src: #click-sound"></a-entity>
  </script>
</a-assets>

<!-- ... -->

<!-- Pass image sources to the template. -->
<a-entity template="src: #plane" data-thumb="#city-thumb"></a-entity>
<a-entity template="src: #plane" data-thumb="#cubes-thumb"></a-entity>
<a-entity template="src: #plane" data-thumb="#sechelt-thumb"></a-entity>
然后传递参数替换掉模板中的变量
使用layout组件排列链接
刚才创建的plane 全部是放在 0 0 0 坐标位置.我们可以使用layout组件来进行排列
<a-entity id="links" layout="type: line; margin: 1.5" position="-3 -1 -4">
  <a-entity template="src: #plane" data-thumb="#city-thumb"></a-entity>
  <a-entity template="src: #plane" data-thumb="#cubes-thumb"></a-entity>
  <a-entity template="src: #plane" data-thumb="#sechelt-thumb"></a-entity>
</a-entity>
增加更多的交互
对链接增加一些交互,移动到上面我们给他进行一些放大.只需要在模板上添加事件处理即可,我们使用event-set 组件只需要添加一些属性.
<script id="link" type="text/html">
  <a-entity class="link"
    geometry="primitive: plane; height: 1; width: 1"
    material="shader: flat; src: ${thumb}"
    sound="on: click; src: #click-sound"
    event-set__mouseenter="scale: 1.2 1.2 1"
    event-set__mouseleave="scale: 1 1 1"
    event-set__click="_target: #image-360; _delay: 300; material.src: ${src}"></a-entity>
</script>
因为我们增加了一个 ${src}模板变量.因此我们要更新链接增加这个data-src变量.
注意
event-set__click事件我们使用_target属性实际设置了另外一个元件的属性
增加背景图切换的过渡动画
使用event-proxy组件可以发送一个事件到其他对象.
<script id="plane" type="text/html">
        <a-entity class="link"
        geometry="primitive: plane; height: 1; width: 1"
        material="shader: flat; src: ${thumb}"
        sound="on: click; src: #click-sound"

        event-set__mouseenter="scale: 1.2 1.2 1"
        event-set__mouseleave="scale: 1 1 1"
        event-set__click="_target: #image-360; _delay: 300; material.src: ${src}"
        proxy-event="event: click; to: #image-360; as: fade">

        ></a-entity>
    </script>
如上面的代码,当我们的连接被点击时,我们发送给 #image-360对象一个fade事件
然后 #image360我们来添加一个淡出淡入的动画.设置startEvent为 fade,
<a-sky id="image-360" radius="10" src="#city"
    animation__fade="property: components.material.material.color; type: color; from: #FFF; to: #000; dur: 2000; startEvents: fade"
    animation__fadeback="property: components.material.material.color; type: color; from: #000; to: #FFF; dur: 300; startEvents: animationcomplete__fade"
></a-sky>
淡入淡出通过对材质颜色进行变化来实现.淡出之后我们的另外一个事件修改背景图.
使用立方体进行投影(CMP Cube Map Projection)
全景图投影使用球形投影,南北极的像素会被拉升,可以看到接缝.下面尝试下立方体投影
等角方块投影(EAC Equi-Angular Cubemap)
CMP方式立方体角落的像素会被拉升,因此Google于2017年提出了新的映射方式,在Cubemap基础上进行了改进。
完成收工
最后完成了一个简单交互的360度VR展示.
代码: vincentmi/aframe-vr: aframe vr guide codes (github.com)
预览: https://vincentmi.github.io/aframe-vr/vr.html
参考 Bringing pixels front and center in VR video (blog.google)
「真诚赞赏,手留余香」
真诚赞赏,手留余香
使用微信扫描二维码完成支付
